|
7/15/2014 0 Comments Making Herbal Oils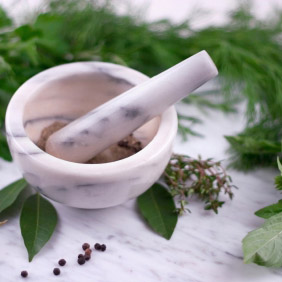 by Lisa Shaub
I use essential oils as medicines for my family. The stronger ones, like wild Oregano oil or Lavender oil I buy from the health food store, but some I make myself. I love the flavor of herbs in my food, and enjoy using my herbal oils for beauty and health as well. The commercial oils are difficult to produce without investing in a still or distillery. They work on a process of steam extraction. Commercial oils are generally not for internal use, but these home made oils can be used safely in food because they are not as strong. Basil oil is great for hair, Lavender oil is good on the face, Oregano oil is famous as a health tonic for colds and flu, Calendula oil is wonderful for soothing burnt skin, Spearmint cools down fevers and Gardenia oil makes me happy. You can also enjoy these in your favorite dishes or salad dressing. Here is how we do it... Take a nice handful of fresh herb leaves and remove the stems. Wash them and let them dry thoroughly; I often dry them with a towel, as you don't want them out too long so they brown. Pound them in a wooden mortar and pestle until they are mushy. If you don't have one you can use a zip lock bag with a towel over it and a hammer pounding the herbs until they are bruised. Place them in a clean glass jar and fill to the top with extra virgin olive oil. I mash it a bit with a fork to get the oils out. Next, leave it in the sun for the day. In the evening strain the oil into a clean class container and refrigerate. The oil keeps a long time this way. My Basil oil from last year is still good. If you are nervous about germs you can add a clove of garlic, but it may change the taste. Make sure to write a label to identify the herb and the date.
0 Comments
7/15/2014 0 Comments Food, Not Fracking by Jessica Wholander, Special Contribution from Food & Water Watch
New York’s food, farms, and agriculture are under threat from fracking, a dangerous gas-drilling method that threatens the purity of our water, air, and land. In New York, we’re fortunate to have access to fresh vegetables from our local farms, yet there are communities around the country who do not have access to such fresh produce. In states where hydraulic fracturing, more commonly known as fracking, is underway, farmers’ livelihoods and the food system they support are threatened. We must send a strong message to Governor Cuomo, demanding that he stop this dangerous practice from undermining our own food systems by banning fracking in our state. Fracking is the process of injecting a mixture of water, sand and chemicals into wells at high pressure to crack dense rock formations and release oil or gas. According to the U.S. Environmental Protection Agency (EPA), up to 75 percent of the millions of gallons of water that is required per well ends up back on the surface as waste water, contaminated with toxic chemicals as well as other naturally occurring pollutants and radioactive material. Researchers Michelle Bamberger and Robert Oswald found that this fluid can leak into the water supplies of residents and farmers, which happens as a result of frequent accidents and normal operations. The consequences are dire. These toxins contaminate the soil, poison livestock, and pollute the air, while methane emissions contribute to climate change. All of this results in decreased productivity of farmers’ fields and livestock while lowering their property value and threatening the safety of locally grown food. Governor Cuomo is considering allowing fracking in regions where farming is central to the local economy. In the Southern Tier, for example, dairy products make up two-thirds of agricultural sales. In Pennsylvania, a study performed by the Penn State Extension showed that counties with dairy farms that had at least 150 fracking wells experienced a 16% decline in their dairy productivity, compared to regions without fracking wells, which experienced a 3% increase in productivity. Because of the clear dangers of fracking, the movement to ban it is gaining momentum. Hundreds of farmers, brewers, vintners and chefs, including Mario Batali of The Food Network, and over 1,000 businesses and 242 organizations have joined the coalition New Yorkers Against Fracking. In addition, on June 30th, the New York State’s highest court dealt a blow to the oil and gas industry when they ruled that municipalities have the power to use zoning ordinances to ban fracking within their boundaries. The court made it clear, however, that they were making a decision only on the rights of municipalities and not on fracking itself, although the implications of this decision could be far reaching. Despite this, Governor Cuomo has not yet made up his mind, so it is imperative that we keep fighting. There are numerous ways to get involved. Food & Water Watch and New Yorkers Against Fracking are planning rallies throughout the summer, and the more people at those rallies the more likely Governor Cuomo is to pay attention. October 11th will be the Global Frackdown, an international day of action to protest the practice. To get information on the times and locations of these rallies feel free to reach out to Food & Water Watch (contact info found below) or visit the New Yorkers Against Fracking website (also below). Anyone can write a letter to the editor of local, state and national newspapers to speak out against the dangerous practice and encourage others to do the same. In addition, Food & Water Watch and New Yorkers Against Fracking are constantly collecting and delivering petitions to Governor Cuomo, a powerful tactic in which everyone can participate. If you are interested in getting involved in any of these actions, we would love to hear from you! Feel free to reach out using the contact info below. Fracking is exceptionally damaging to our water, air, and soil. If our environment becomes contaminated, the food we eat will be as well. If we are going to continue to enjoy fresh, local vegetables, we must urge Governor Cuomo to ban fracking now! Jessica Wohlander, MA is an activist with Food & Water Watch, a nonprofit consumer organization with offices in Brooklyn (www.FoodandWaterWatch.org). To get involved, contact Jessica at jwohlander@fwwlocal.org. www.foodandwaterwatch.org www.nyagainstfracking.org  by Cassie Sciortino When I first glimpsed what my fridge looks like with 8 pounds of vegetables stuffed into, I was, in a word, intimidated. My roommate and I had gone in on a half share of veggies together in an attempt to eat cleaner, but as I sorted through the leafy greens, gnarled carrots and seemingly never ending supply of mysterious produce, I couldn’t help but feel like I’d never find a use for all of it by the week’s end. A month or so into the season and I’m finally starting to get the hang of utilizing the beautiful crops from Hepworth Farm; here are a few of the tricks I’ve come to learn. 1. Do the prep work Before your weekly delivery, make sure you stock up on supplementary products that will pair with pretty much any produce you receive, such as olive oil, fresh lemon juice, kosher salt, and black pepper. Whole grains like brown rice, quinoa, and barley are another staple component to create a hearty meal out of your veggies. I’ve spent the last 25 years avoiding salad, so even I was surprised that having homemade salad dressing on hand made me crave a bowl of raw vegetables. I pair delicate vinaigrettes with more fragile greens, while saving heartier dressings for more sturdy lettuce varieties. 2. Workhorses Do more with less by creating versatile recipes that can multitask. Pesto is one example: it’s a great way to use spinach and whatever herbs you have on hand, and tastes just as delicious slathered on chicken or pasta as it does on toast, topped with a fried egg. Another versatile ingredient is butter. Compound butters are a useful way of utilizing an abundance of herbs- slather cilantro lime butter on cobs of sweet corn, served shrimp sautéed in garlic butter, or dip your fresh radishes in chive-studded, creamy deliciousness. 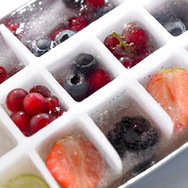 3. Drink Up
Consume multiple servings of vegetables by blending them into a delicious, vitamin rich and fiber filled smoothie. I like to add bananas for creaminess and berries for a sweet touch, but if you can go full throttle vegetable, more power to you. Bonus: frozen greens create a thicker, pleasantly icy texture and, when stockpiled, can last you well into the fall months. 4. Employ Your Freezer Speaking of frozen produce, keep hydrated by freezing various herb and fruit combinations in your ice cube tray. Raspberries & mint and strawberries & basil are just a two pretty pairs to get you started. Once frozen, pop a few cubes into your water bottle for a flavor boost all day long. Alternately, blend fruit and herbs and freeze into popsicle molds for homemade treats throughout the summer (think blackberry tarragon, lemongrass cucumber, etc) Picked Radishes
2. In a non-reactive saucepan, bring the water, vinegar, salt, and sugar or honey to a boil, until the sugar and salt are dissolved. Remove from heat and add the peppercorns, garlic and chile, if using. 3. Pack the radishes in a clean pint-sized jar, and pour the hot liquid over them, adding the garlic and chile into the jar as well. 4. Cover and let cool to room temperature, then refrigerate. Storage: The radishes will be ready to eat after 24 hours. During storage, the liquid will turn a nice rosy color and flavors -such as garlic and hot peppers – will get stronger. The radishes can be kept in the refrigerator for up to one month. Pickled Sugar Snap Peas
2. When the vinegar mixture is cool, pack the sugar snaps, garlic and chile peppers or flakes into a 1-quart jar or bowl, and pour the brine over it. Cover with a non-reactive cap, or plastic wrap. 3. The original recipe suggests you store the jar in the refrigerator for two weeks before eating the pickled peas, but good luck with that. They’re quite delicious and already lightly pickled by 24 hours later. Ab's B and B's
1. Combine onion and cucumber in a clean spring-top jar. 2. Combine the remaining ingredients in a non-reactice saucepan and bring to a boil. Simmer for 4 full minutes to wake up the flavors in the spices. 3. Slowly pour the pickling liquid over the onion and cucumber slices, completely filling the jar. Allow the pickles to cool to room temperature before topping off with any remaining pickling liquid. Refrigerate. 4. Refrigerate the pickles for a week to ripen. They will keep for about two months in the refrigerator. Pickled Garlic Scapes
2. Combine the vinegar, water and pickling salt in a pot and bring to a boil. Slowly pour the hot brine over the garlic scapes, leaving 1/2 inch headspace. Once the jar is full, tap the jar lightly to dislodge any air bubbles. Check the headspace again and add more brine if necessary. 3. Wipe the rim, apply the lid and ring, and process in a hot water bath for 10 minutes. Let these pickles cure for at least a week before eating. Pickles will last for several weeks in refrigerator after initial seal is broken. Pickled Beets
 by: Cassie Sciortino
When your fridge is still fully stocked with your CSA bounty but you can’t bear to eat another salad, this is the recipe to put your summer beets to work. Their earthy flavor pairs surprisingly well with bittersweet chocolate, and their water content lends itself to a lusciously moist crumb. It’s red velvet’s older, more sophisticated cousin, and your new seasonal classic. Slightly adapted from Nigel Slater’s Tender (Ten Speed Press, 2011). Ingredients 8 ounces fresh beets 7 ounces fine dark chocolate (70% cacao) 1/4 cup hot espresso 3/4 cup + 2 tablespoons butter 1 cup + 2 tablespoons all-purpose flour 1 1/4 teaspoons baking powder 3 tablespoons good quality cocoa powder 5 eggs Scant 1 cup superfine sugar Confectioner’s sugar, to serve Directions Cook the beets, whole and unpeeled, in boiling water. Depending on their size, they will be tender within 30 to 40 minutes. Young ones may take slightly less time. Drain them, let them cool under running water, then peel them, slice off their stem and root, and process in a blender or food processor until a coarse purée. Lightly grease an 8-inch spring form cake pan with the two tablespoons of butter, and sprinkle evenly with flour. Heat the oven to 350F. Melt the chocolate, broken into small pieces, in a small bowl set over a pot of simmering water. Don’t stir. When the chocolate looks almost melted, pour the hot espresso over it and stir once. Cut the butter into small, evenly sized pieces and add to the melted chocolate. Leave the butter to soften. Sift together the flour, baking powder and cocoa. Separate the egg whites from the yolks, putting the whites in a large mixing bowl. Stir the yolks together. Now, working quickly but gently, remove the bowl of chocolate from the heat and stir until the butter has melted into the chocolate. Let sit for a few minutes, then stir in the egg yolks. Fold in the beets. Whisk the egg whites until stiff, then fold in the sugar. Firmly but gently, fold the beaten egg whites and sugar into the chocolate mixture; work in a deep, figure eight movement but take care not to over-mix. Lastly, fold in the flour and cocoa mixture. Transfer quickly to the prepared cake pan and put in the oven, decreasing the heat immediately to 325 degrees F. Bake for 40 minutes. The rim of the cake will feel spongy; the inner part should still wobble a little when gently shaken. Test with a cake tester or toothpick. If it is still gooey in the center, continue baking just until moist crumbs cling to the tester. Set the cake aside to cool (it will sink a bit in the center), loosening it around the edges after half an hour or so. Wait until the cake is fully cooled before unmolding. Serve in thick slices, dusted with confectioner’s sugar. |
CSA NewsletterFood news, CSA news, recipes, and lots of other goodies! Archives
October 2017
Categories |
 RSS Feed
|
Sixth Street Community Center
638 E 6th Street between Aves B & C • (212)-677-1863 |
© 2014 Sixth Street Community Center. All rights reserved. |